Julep Maven Check This OUT!

The doorbell rang this morning and to my delight I found something much better than a visitor.  It was a big black box filled with goodies, you know, the manicure type.  Very cool.

Last week for only 20 bucks, I joined the Julep Maven Program.  It's this super neat-o thing where they send you a Monthly Beauty Editor Sneak Peak Box.  This means that they send you a great box of stuff like new colors and skin treatments EVERY MONTH.  This is what came in my box this month:


Okay, so first out of the box came a full sized Glycolic Hand Scrub.  Now, lemme tell you that this is 3 oz. of Heaven in a little squeeze tube!  My hands feel a lot smoother and I've only used it once!


 Then, came 3 bottles of nail polish, all neatly wrapped up in pink tissue paper.  It's really neat how they choose the colors to send you, when you sign up to join their Maven program, you take a fun little quiz.  They ask you a couple of questions then, BAM, they magically know what colors to send you.  And the polish is the best polish I have EVER put on.  One coat gives wonderful, smooth coverage.  No polish I've ever tried compares!


    I got Samantha, which is a hot pink.


The other color was Zoe (a new unrealeased Fall color)  which is a cool copper.


They also gave me nail therapy.  You put it on your nails to create flexablity and strength.

Next out of the box came to single use packets, one a glycolic hand scrub and the other SPF 30 hand cream.

Also included in the box was a nice letter from the CEO and founder of Julep.  It was even signed, which I thought was really sweet.  <3  There was also a little card which listed all the things that came in the box and the retail value.  This month's was worth $76.00...and I only payed $19.99!!!  It's insanity!  In a good way of course!

It all came in a nice little bag, which was tied up with a pink ribbon, just like a present.  This is handy if you forget a friends birthday, you can have your monthly box shipped to her house and just blame the slow mail system. 

I already can't wait until next month!  I'll give you guys the link so that you can check it out.  I really do recommend it, I mean, it's just so cool, and every month you get the thrill of a box filled with goodies arriving on your doorstep.  So look into it.  It's a totally Nail Artista recommended thing! 
http://www.julep.com/maven.htm
(scroll down under the video, and to the far right there is a pink 'take quiz' button.  Press it and you are on your way!)

Simple Marbling Technique

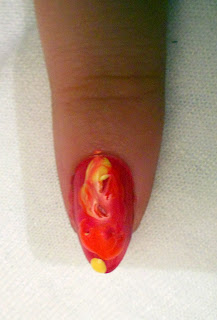
I'm going to show you a really super neat-o technique called marbling.  Now, there are ways to marble your nails using water and a tooth pick, but this version is much simpler, and all you need is a paintbrush.

  1. Choose 3 or 4 colors that you want to marble with.  You then give yourself a basic manicure with one of the colors you have chosen. (just to give it a colored base coat)  

I used the primary colors (showed up on yellow the best). 
The colors I used were OPI *OFF WITH HER RED*,
S.H. Xtreme Wear *MELLOW YELLOW*,
and
Sinful Colors *FLY AWAY*


2.   The second step is to drip several drops of each color onto your nail.  If they overlap, I find that it makes the swirl look even better.


3.  Then, you take a small paintbrush, or a toothpick and drag it through the drops of color.  Swirl the paintbrush through it very carefully, making sure not to mix the colors or you will end up with a mucky-yucky brown.


4.   There is going to be a lot of polish on your nail, so it will take a little longer to dry that a usual mani.  After it is dry, you just clean up the sides with a Q-Tip and top coat it.  That's it.


Now, wasn't that easy?  And it was kinda fun at the same time.  So try it out, play around with it, and lemme know what you think. 

Disco/70's Inspired Nail Art

Are you suffering from Night Fever?  Feel the need to be Stayin' Alive?  Then get on down to Funky Town, it's the only way to beat the groove.  Go over to the Brick House, next to the Carwash and have a Celebration.  If that doesn't cure you...well...I guess it's just to late, and you'll just have to give in to the beat and get down and funky with the rest of the groovy dudes and chicks around. 

This is a pretty simple nail art tutorial.  It uses a type of marbleizing technique that looks really rockin'.  To start pick a couple of disco-y colors.  I started by giving myself a simple manicure with one of the each of the colors I planned to use. (I alternated hot and cold colors, but you could do all pinks or all blues or all whatever.)


The second step is to place dots of coordinating colors on your nails.  You want the dots to be droplets on your nails.  You need to have enough polish to swirl around to cover your nail. 


This is one of those times that you've gotta work kinda quick.  You take a toothpick or a dotter tool (see above picture) or even an stiff paint brush.  You begin to pull the droplets of polish around, swirling them together but, DO NOT MIX THEM!!!!!!!!!!!!!!!!!!!!


Continue to do this until your entire nail is covered with the swirl.  It may be that you have to add a few more drops of polish here and there to be able to cover the entire nail.  Just be sure to use enough variety of colors to make the nails look swirled.


It may take a few more minutes to dry entirely depending on how much polish you applied.  After it drys, take a Q-Tip and some remover and clean up the edges (chances are the you'll make a mess of your fingers, but that's oke-doke).


The next step is to apply a glitter top coat to it.  I'm showing you what it looks like with a softer, subtler glitter, but it looks good with larger glitter too.


After your glitter has dried you can leave the design as is or...you can continue to funk it up.  I used some far-out stickers for scrapbooking to continue adding to the glam-ness.  All I did was add a drop of regular top coat where I wanted the sticker and then I placed the sticker on the nail and waited for it to dry.


HEY! WHERE'S THE DISCO BALL?!!!?!!!


BURN! BABY! BURN!


The colors I used are:
Sinful Colors Fly Away (blue)
Finger Paints Chrysanthe-Mum's The Word (Green)
S.H. Xtreme Wear Mellow Yellow (yellow)
Sinful Colors Big Daddy (orange)
Borghese Raspberry Sorbetto (pink)
C.G. Boundless Color City Lights (glitter)


Thanks for viewing! PEACE OUT!

Dual Color Chevron French Mani

Oke-doke, I admit I've been neglecting my blog just a little to catch up on some ZZZZZ's, for that I apologize dearest friends. 

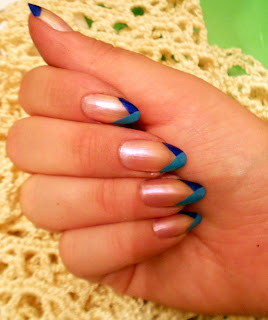
  Tonight I'm going to show you my favorite style of French Manicure, the Chevron French.  A Chevron French is when you use two straight lines to create an upside down 'V' shape for your smile line.  Does that make sense? No...well, just hang tight and I'll show you.

Start out with a base coat.  I don't particularly care for using a clear base coat.  I'm not big on seeing my natural nail underneath my manicure.  So, whenever I do French Manicures, I use a color by Nina Ultra Pro called MOLTEN OPAL.  It's a sheer, pearly white.  I  really love it.


Okay, after the base coat drys, you can begin the Chevron.  You start with one color, in my case I started with the darker color first.  The great thing about this type of French is that it doesn't really require an extremely steady hand.  You simply pull the brush out of the bottle and swipe it, on a diagonal, from one edge of your nail to the middle.  (See below pic for clearer instruction, and I'm sorry about the quality, the camera is on the blink.)


After that has COMPLETELY dried, you then take a second color, in my case the lighter one, and go in the other direction.  You start at one edge of the nail and swipe the brush toward the middle.  Allow the second color to overlap the first at the center of the nail (Again, see the pic for clarification.)


Both colors are Orly.  The darker blue is Royal Navy and the lighter blue is Blue Collar. 

Sure, you can keep it the way it is, but I like to jazz it up a little.  I took a gold glitter and outlined the French.


Continuing with the glamming up, I added little aquamarine rhinestones in the very center of the 'V' shape.  Then I gave it a real good top coating...and that was it.  


There you go, a little change up from your typical pink and white French that isn't too diffcult and you can do it all by yourself. 
Thats all I've got for you guys tonight, so I'm saying peace out until next time.


Neon Checkered Nail Art

It's been a few days and I apologize friends, but I'll make up for it with a really cool lookin' nail art tutorial! I'm going to show you an easy way to make a checkered pattern on your nails, and  I'm going to use some really cool looking colors while I'm doing it!  Oke-Doke, here we go!~

1) As always start with your typical manicure basics, you know, soak your nails, clean underneath, push the cuticles back, base coat...alright I get it, I won't bore you anymore.  Now it's time for the base color.  I used 5 different neon colors (purple, pink, green, orange, and yellow).


2) Now, make sure that your base color is completely dry before attempting step 2.  Step 2 is to take a marker or drawing utensil of some sort and make checks on your nails.  I use a felt tip pen because it shows up really great, you just have to be careful not to get it on the skin. 
  I have found that for me three vertical lines, and six horizontal lines cover my nails in a nice, even grid.  After you get kinda good and gain a really steady hand, you can eliminate this step, but I find it useful.


3) The next is a really simple step, you just paint over the lines you drew with black nail polish.


4) Fill in every other box with the black nail polish.  This will complete your checkered pattern! 

Now, after you have completed the pattern, it is extremely important that you top coat it as soon as it drys.  I can't stress that enough, if you chip it once, no matter how hard you try to fix it, it won't look right.  So make sure that you TOP COAT!!!!!!

Another fun little thing that you can do is put glow in the dark polish on before making the grid, it will make you a glow in the dark checker board!  Isn't playing with nail polish fun?!?

(The colors I used were KleanColor 'Neon Purple', Heaven 'Pinky Pink', Sinful Colors 'Irish Green', Heaven 'Serenity', and Heaven 'Alluring')

Revlon Just Tinted

Oke-Doke...I've gone and splurged $9.00 on a bottle of the new Revlon 'Just Tinted'...personally...I think it kinda stinks, and here's why.
First off, I bought it thinking that it's was gonna be some really super cool thing...to me it just looks like matte nail polish.  I only bought the color "Victorian", which is a matte pink-like color.  Sadly, the color is very sheer (hence the name 'Tinted' I guess), and it seems to make my nails underneath appear yellowed.  To tell you guys the complete truth...I'm not even happy with the color.  It's cheap-looking, plain, and boring.  I really don't suggest wasting your money on this color...then again, I've only tried this one color in the collection.  Sadly, it has put a bad taste in my mouth and I won't even waste my money on buying a different color for fear of it being just as bad...


On one-single-little positive note, I did discover a use for this polish so that it won't go entirely to waste.  I found that you can put a single coat over any color nail polish to turn that polish matte.  It even worked over black without the color showing up!  So there you go, an alternative to letting it sit in the bottle for years, slowly drying up, and throwing your $9.00 away.

I just thought I'd end on a positive note tonight...even if it is only slightly positive...

Again the color I bought is REVLON JUST TINTED 'Victorian'.

Crackle Nail Art

Super quick blog tonight. I just wanna tell you guys about this real great idea I had. I found that you can create some really cool nail art by using a nail art brush and a couple of colors from the CHINA GLAZE CRACKLE collection.
I really like the new metallic colors over black polish, but the regular colors look nice too. So...here are some pics.


Glitter Nails Without Glitter Polish

Hello world it is August 1st, 2011...I just thought that everyone would like to know that...oke-doke...moving on.
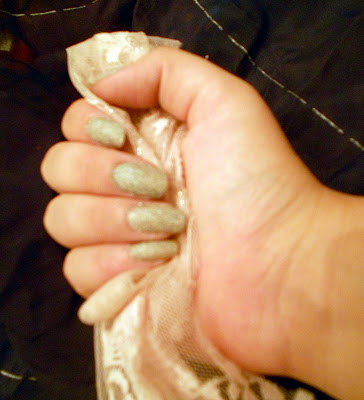
I'm gonna show you a real simple way to get real pretty glitter nails. It uses absolutely NO glitter nail polish, no fuss, no extreme clean-up afterward, and no brains. Does that sound good or what?!?
I have found that instead of waiting forever for a few coats of pretty glitter polish to dry, you can have a gorgeous glitter mani in only a few minutes...and, depending on the materials you use, it could be cheaper than a bottle of glitter polish.
What you need is a bottle of base coat, a top coat, and a jar of glitter.

You pour a little bit of glitter out onto a plate, or paper, or something.


You put on a coupla swipes of base coat and roll your nail in the glitter to get full coverage.


Then you simply cover the glitter with your top coat...wave your hands back and forth for a few seconds until the topcoat is dry...and you are ready to go.


Now, like a fool I went and spent five dollars a pop on nail art glitter made by SuperNail. The colors and glitters are really pretty, but you can use any glitter, from anywhere. At Walgreens, they sell LA Splash glitter for your nails. I spent a couple of dollars on a whole bunch of colors rather than ten dollars on two little jars. You could also use just any little bit of glitter that is just lying around. I bought glitter from TULIP for fifty cents after Easter. It works just as well as nail art glitter and it costs a lot less.
The little jars that the glitters come in really make them easy to store, too. I keep mine in a sundae cup. It's the perfect size and it adds a cute touch to any decor.


So try it out and let me know what you think!

Circus Themed Nail Art

I very often find myself inspired by some of the strangest thing, when it comes to my nails. I have found that anything from a music video, to a pair of shoes, to a tube of toothpaste can be inspirational. This nail art was inspired by the brilliant colors seen at the circus and it's crossed with the inspiration gained from those stunning vintage boudoir slippers, you know the ones with the pretty feathers on them that simply scream GLAMOROUS!
Anyway, it's a pretty simple design. I simply used bright colors as my base, then added white dots, and glued on a pom-pom. Pretty simple and the results are really fun!!!


(Just in case you people are wondering the colors I used are...China Glaze FROSTBITE *blue*, Milani RUBY JEWELS *RED*, Sally Hansen HD LITE *yellow*, 10 Professional Nail Lauquer SPELLBOUND *purple*, and S.H. Xtreme Wear CRUSHED *orange*

OPI Miss Universe Collection

The Miss Universe Collection by OPI is set to release to the public in August but...I was lucky enough to get my hands on a set before the official release date so that I could tell everyone about it! It's a collection of four new colors.


The first color is "Swimsuit...Nailed It!" It's a gorgeous navy blue with a metallic shine. It goes on smooth and two coat covers wonderously. The only thing that I must caution is that this is NOT the nail color to get lazy with. If you do not put a base coat on underneath it, it will stain your nails. With that said, 'Swimsuit...Nailed It!' gets a great big thumbs up from the Nail Artista!


The second color is a silver glitter named "Crown Me Already!". This silver glitter works great as a top coat but I prefer to put three coats on and wear it by itself. It's eyecatching, and glittery, and shiny...and did I mention shiny. It is comprised of little silver shiny-s and bigger hexagon shaped glitters. It's really pretty and long lasting. I didn't use a top coat (lazy me!) and it lasted without a single chip for three whole days! The only issue I have with 'Crown Me Already!' is that it is very, VERY difficult to get off. It took me well over fourty-five minutes to get it off and even at that there was still a few stuck glitters on my nails.


The third color is "Its My Year". This color is very nearly the same exact color as Serena Williams' 'Rally Pretty Pink'. The only difference is that 'Its My Year' has a tiny bit more sparkle, and a tad more gold instead of pink. This color, I did note, looks much better on my hands than the 'Rally Pretty Pink' did. It's a really pretty color though.


The final color in this collection is 'Congeniality Is My Middle Name'. Its a dark pinkish-red. It has a very old-time-silver-screen-vixen look to it. I think I may have to add it to one of my top fave red polishes. It took three coats to get the color just perfect but it is very pretty.


These four new colors from OPI really do deserve to be called the Miss Universe Collection because they are all beautiful. They are also very sturdy which is always a big plus, especially for those of us that are hard on our hands. I really do suggest that everyone look into the Miss Universe Collection in August. There is a color in the collection to suit everyone's taste.