Dual Color Chevron French Mani

Oke-doke, I admit I've been neglecting my blog just a little to catch up on some ZZZZZ's, for that I apologize dearest friends. 

  Tonight I'm going to show you my favorite style of French Manicure, the Chevron French.  A Chevron French is when you use two straight lines to create an upside down 'V' shape for your smile line.  Does that make sense? No...well, just hang tight and I'll show you.

Start out with a base coat.  I don't particularly care for using a clear base coat.  I'm not big on seeing my natural nail underneath my manicure.  So, whenever I do French Manicures, I use a color by Nina Ultra Pro called MOLTEN OPAL.  It's a sheer, pearly white.  I  really love it.


Okay, after the base coat drys, you can begin the Chevron.  You start with one color, in my case I started with the darker color first.  The great thing about this type of French is that it doesn't really require an extremely steady hand.  You simply pull the brush out of the bottle and swipe it, on a diagonal, from one edge of your nail to the middle.  (See below pic for clearer instruction, and I'm sorry about the quality, the camera is on the blink.)


After that has COMPLETELY dried, you then take a second color, in my case the lighter one, and go in the other direction.  You start at one edge of the nail and swipe the brush toward the middle.  Allow the second color to overlap the first at the center of the nail (Again, see the pic for clarification.)


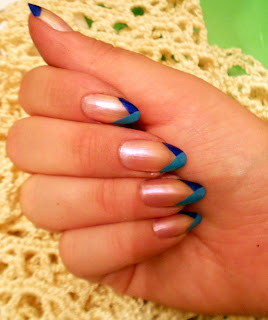
Both colors are Orly.  The darker blue is Royal Navy and the lighter blue is Blue Collar. 

Sure, you can keep it the way it is, but I like to jazz it up a little.  I took a gold glitter and outlined the French.


Continuing with the glamming up, I added little aquamarine rhinestones in the very center of the 'V' shape.  Then I gave it a real good top coating...and that was it.  


There you go, a little change up from your typical pink and white French that isn't too diffcult and you can do it all by yourself. 
Thats all I've got for you guys tonight, so I'm saying peace out until next time.


Neon Checkered Nail Art

It's been a few days and I apologize friends, but I'll make up for it with a really cool lookin' nail art tutorial! I'm going to show you an easy way to make a checkered pattern on your nails, and  I'm going to use some really cool looking colors while I'm doing it!  Oke-Doke, here we go!~

1) As always start with your typical manicure basics, you know, soak your nails, clean underneath, push the cuticles back, base coat...alright I get it, I won't bore you anymore.  Now it's time for the base color.  I used 5 different neon colors (purple, pink, green, orange, and yellow).


2) Now, make sure that your base color is completely dry before attempting step 2.  Step 2 is to take a marker or drawing utensil of some sort and make checks on your nails.  I use a felt tip pen because it shows up really great, you just have to be careful not to get it on the skin. 
  I have found that for me three vertical lines, and six horizontal lines cover my nails in a nice, even grid.  After you get kinda good and gain a really steady hand, you can eliminate this step, but I find it useful.


3) The next is a really simple step, you just paint over the lines you drew with black nail polish.


4) Fill in every other box with the black nail polish.  This will complete your checkered pattern! 

Now, after you have completed the pattern, it is extremely important that you top coat it as soon as it drys.  I can't stress that enough, if you chip it once, no matter how hard you try to fix it, it won't look right.  So make sure that you TOP COAT!!!!!!

Another fun little thing that you can do is put glow in the dark polish on before making the grid, it will make you a glow in the dark checker board!  Isn't playing with nail polish fun?!?

(The colors I used were KleanColor 'Neon Purple', Heaven 'Pinky Pink', Sinful Colors 'Irish Green', Heaven 'Serenity', and Heaven 'Alluring')

Revlon Just Tinted

Oke-Doke...I've gone and splurged $9.00 on a bottle of the new Revlon 'Just Tinted'...personally...I think it kinda stinks, and here's why.
First off, I bought it thinking that it's was gonna be some really super cool thing...to me it just looks like matte nail polish.  I only bought the color "Victorian", which is a matte pink-like color.  Sadly, the color is very sheer (hence the name 'Tinted' I guess), and it seems to make my nails underneath appear yellowed.  To tell you guys the complete truth...I'm not even happy with the color.  It's cheap-looking, plain, and boring.  I really don't suggest wasting your money on this color...then again, I've only tried this one color in the collection.  Sadly, it has put a bad taste in my mouth and I won't even waste my money on buying a different color for fear of it being just as bad...


On one-single-little positive note, I did discover a use for this polish so that it won't go entirely to waste.  I found that you can put a single coat over any color nail polish to turn that polish matte.  It even worked over black without the color showing up!  So there you go, an alternative to letting it sit in the bottle for years, slowly drying up, and throwing your $9.00 away.

I just thought I'd end on a positive note tonight...even if it is only slightly positive...

Again the color I bought is REVLON JUST TINTED 'Victorian'.

Crackle Nail Art

Super quick blog tonight. I just wanna tell you guys about this real great idea I had. I found that you can create some really cool nail art by using a nail art brush and a couple of colors from the CHINA GLAZE CRACKLE collection.
I really like the new metallic colors over black polish, but the regular colors look nice too. So...here are some pics.


Glitter Nails Without Glitter Polish

Hello world it is August 1st, 2011...I just thought that everyone would like to know that...oke-doke...moving on.
I'm gonna show you a real simple way to get real pretty glitter nails. It uses absolutely NO glitter nail polish, no fuss, no extreme clean-up afterward, and no brains. Does that sound good or what?!?
I have found that instead of waiting forever for a few coats of pretty glitter polish to dry, you can have a gorgeous glitter mani in only a few minutes...and, depending on the materials you use, it could be cheaper than a bottle of glitter polish.
What you need is a bottle of base coat, a top coat, and a jar of glitter.

You pour a little bit of glitter out onto a plate, or paper, or something.


You put on a coupla swipes of base coat and roll your nail in the glitter to get full coverage.


Then you simply cover the glitter with your top coat...wave your hands back and forth for a few seconds until the topcoat is dry...and you are ready to go.


Now, like a fool I went and spent five dollars a pop on nail art glitter made by SuperNail. The colors and glitters are really pretty, but you can use any glitter, from anywhere. At Walgreens, they sell LA Splash glitter for your nails. I spent a couple of dollars on a whole bunch of colors rather than ten dollars on two little jars. You could also use just any little bit of glitter that is just lying around. I bought glitter from TULIP for fifty cents after Easter. It works just as well as nail art glitter and it costs a lot less.
The little jars that the glitters come in really make them easy to store, too. I keep mine in a sundae cup. It's the perfect size and it adds a cute touch to any decor.


So try it out and let me know what you think!